Monday, October 30, 2017

Fall Theme Library Picks


            Hey folks! It's a little too close to Halloween to be sharing a Halloween-themed book list with you last minute (Or maybe it's not, but I'm just not that kind of blogger. ;). But, in case you haven't covered or finished your fall-themed lessons yet, I wanted to share with you some good books we discovered at our library for covering some fall-themed topics!


Patty's Pumpkin Patch

My 5 year old and I both like books that incorporate alphabet learning in a fun way. This is one such book. Plus, it covers what goes into raising a pumpkin patch and even what is going on in the pumpkin patch throughout the seasons.


Pumpkin Circle: The Story of a Garden

We are all about child-led learning, especially at this young age, so Myka directs what we learn about, for the most part. She said she wanted to learn about where pumpkins come from, so I knew this book would be perfect when I came across it! Storybooks are fun, but I love books that include real pictures, such as this one. The text is very straightforward and simple too.


Crinkleroot's Guide to Knowing the Trees

Have you heard of the Crinkleroot series? We only have one of the books so far, but I'm hoping to check more out soon. They are all about nature-related stuff! To be honest, we haven't looked at this one together yet, but I think it looks amazing. I made learning to identify trees one of my goals last fall, so it's kind of a little game I keep in the back of my head at all times, especially when we go on nature walks.


Why Do Leaves Change Color?

This one looks like it is full of great information as well, but (hopefully) easy enough for my 5 year old to understand. This was another subject she said she wanted to learn about, but I haven't been able to talk her into reading this book with me yet. * sigh * I did skim through it, though, and it looks like a good one for a willing listener. ;)
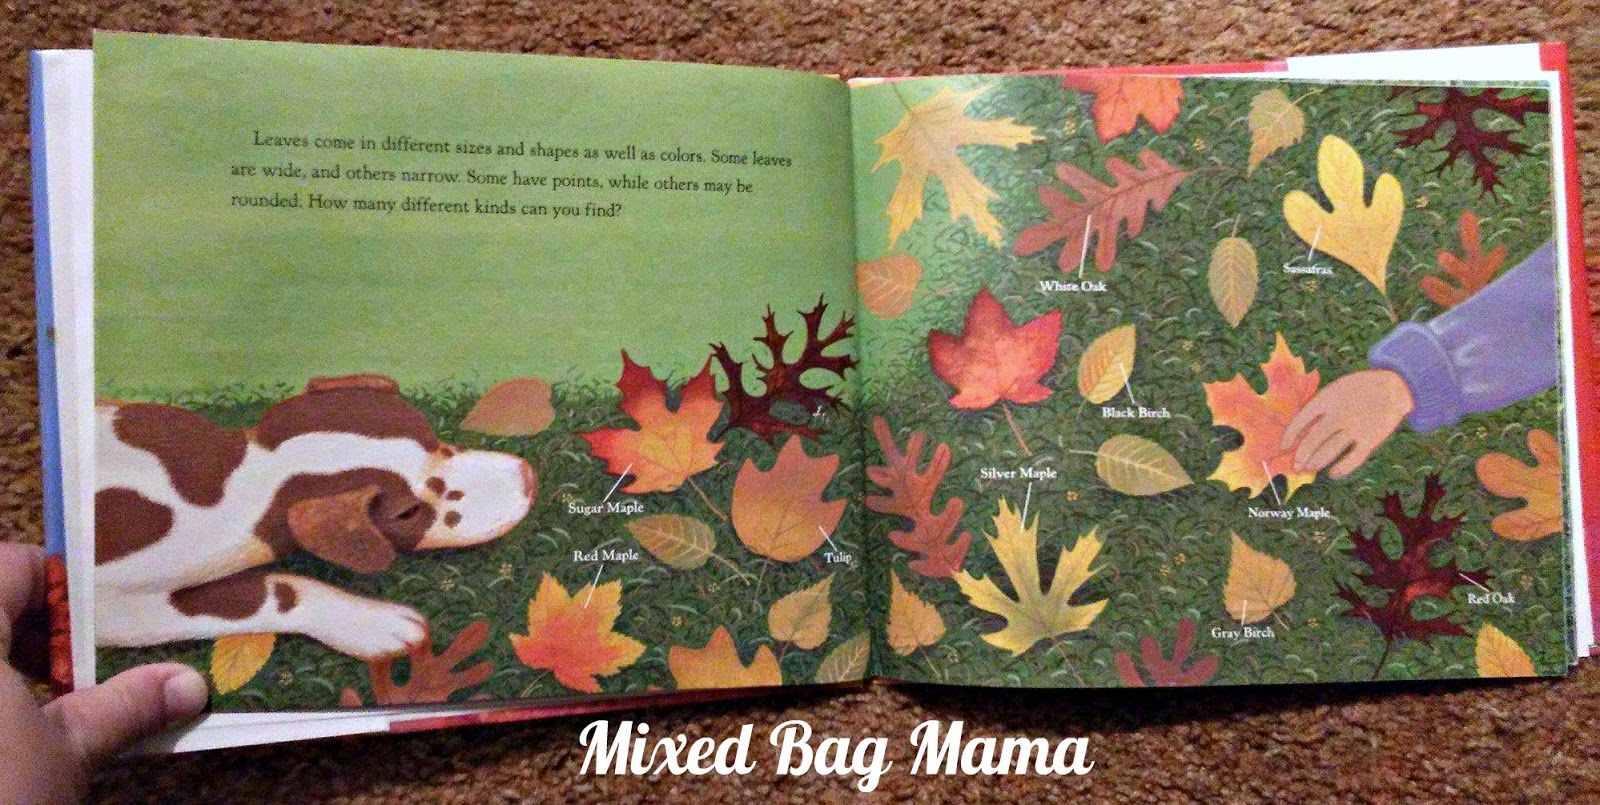

I Am a Leaf

Myka often likes to repeat me when we read together, so I thought it might be time to start getting the early reader-type books. If you have or have had a child close to my age, I'm sure you've already discovered just how boring some of these books can be since, you know, they're easy for us and very straightforward. However, this one was actually pretty fun! It's told from the perspective of a leaf, but included simple information about leaves and trees as well.


What are your favorite books to read to learn about fall?

Fab Friday Link Up

This Is How We Roll Thursday Party

Friday, October 27, 2017

Magic Canvas Giveaway

Sponsored By: Magic Canvas

Hosted By: Love, Mrs. Mommy

Winner will receive a Magic Canvas!

Magic Canvas is a dual-sided board that comes with 1 stylus that you fill with water. Once filled, your child can draw with it to unveil a rainbow spectrum of colors! As these colors magically appear at the surface, your child’s drawing will take on new creative heights! The canvas size is quite large at 13 x 1.5 x 10.8 inches, but it’s still small enough to transport and even take in the car! Plus, with its weight at only 11.2 ounces, and it’s trusty handle, your child won’t have any trouble holding onto it or carrying it around. Perfect for on-the-go fun!
Open to the Continental US and Canada. Must be 18+ to enter.
Giveaway Dates ~ 10/27 8:00 PM EST through 11/17 11:59PM EST
Disclosure: Love, Mrs. Mommy and all participating bloggers are not held responsible for sponsors who do not fulfill their prize obligations. This giveaway is in no way endorsed or sponsored by Facebook or any other social media site. The winner will be randomly drawn by Giveaway Tools and will be notified by email. Winner has 48 hours to reply before a replacement winner will be drawn. If you would like to participate in an event like this please contact LoveMrsMommy (at) gmail (dot) com.

Wednesday, October 25, 2017

Monthly Crafting Book Club: Sir Pete the Brave


            Hey folks! It's one of my favorite times of the month: Monthly Crafting Book Club time! I mean, it does combine two of my favorite things: childrens books and crafts, so what's NOT to love? 
            This month's theme is Pete the Cat! If you haven't at least heard of Pete the Cat, you've either been living under a rock or don't have young kids. For our selection, we chose Sir Pete the Brave, which is an “EZ reader”. I forgot to check a regular storybook out at the library and the only other Pete book we own is the special Easter one. Anyways...
            I feel like Myka will be ready and wanting to start learning sight words soon, so I've been buying and borrowing a lot more EZ reader-type books lately. Pete the Cat seems to be one of her new favorites, so it just made sense. Sir Pete the Brave takes us on a journey of brave Sir Pete looking for the missing Lady Callie. Complete with a dragon and adventure, any young kid is sure to love this story.
            Another one of Myka's newest favorite things is puppets. So, going along with our craft from last month's post, we made some craft stick puppets! I may have gone a little overboard...


Recommended for: Ages 2-6+

What You'll Need:

-Sir Pete the Brave printable
-Cardboard
-Glue stick
-Sharp scissors
-Hot glue gun
-Craft sticks
-Hook and loop tape (aka Velcro)
-Push pin (optional)

(For the record, our ink is almost out. These aren't the way the colors should look.)
*First, print out the printable from above and cut out your pieces.

*Next, glue your pieces to the cardboard. (We used some that was going in the recycle bin anyways i.e. pizza boxes)

*Carefully cut your pieces and characters out. They don't have to be perfect. ;)

*For your character pieces (Lady Callie, Sir Pete, the horse, and the dragon), hot glue a craft stick to their backside. (You can use regular glue, of course. I'm just really impatient and have an unhealthy obsession with my hot glue gun.)

*For your other pieces, glue small pieces of the hook and loop tape as needed. (Make sure the “poky” side is facing out.)

*This is optional, but I thought it would be fun to stick a push pin through the oar and boat so you can actually row it. ;)


            Voila! I've been on a felt board kick, hence the using Velcro on the backs of some of our pieces. You can move them around as needed for each “scene”. This is a fun activity to bring the book to life...or even come up with your own adventures to act out!

This Is How We Roll Thursday Party

Tuesday, October 24, 2017

AvoSeedo: Fun for the Whole Family!


            Hey folks! I have a great gift idea to share with you today. Whether you're looking for a Christmas season gift for that impossible recipient who already has everything or a “just because” present for the green thumb in your life, AvoSeedo has your back! What is AvoSeedo? Here are some key things you should know:

-AvoSeedo is an avocado tree germinator bowl that makes it easy for everyone to grow their own plant at home from a simple avocado pit.
-Easy to use for all ages of amateur avocado arborists
-Fun family project to make a tree sprout and watch it grow from the pit of a common avocado
-Clever AvoSeedo bowl design keeps the avocado pit immersed in just the right amount of water to grow effectively
-Germinate and grow an avocado tree in your own home, whatever the climate
-Made for durability from recyclable, non-toxic materials
-Reusable for other vegetables like lettuce, celery, carrot tops!

            Sounds interesting and fun, right? In case you're not aware, avocados can be kind of tricky to get to sprout, hence what creates the need for this product and makes it so awesome!
            I was especially excited to try the AvoSeedo for a couple of reasons. First of all, my husband, for fun, had tried to sprout an avocado pit earlier this year to no avail. I'm sure it had nothing to do with the fact that we kind of forgot about it and it wasn't touching the water after awhile. :/
            Another reason I was looking forward to trying it is because my 5 year old and I like doing things like this together. We live on a small farm, so how things grow is interesting to her. Plus, it's not the first time we have tried to grow some trees from seed. (I'm always up for tree growing experiments! :D) I'm willing to bet we will have much better luck with our AvoSeedo than we have with our other tree seeds in the past.
            I would have taken some pictures of Myka helping me out, but she was having one of her “I just want to run around in my underwear” days. It is what it is. She wasn't feeling 100%. Whatever. I promise she was helping me, though. ;) Here's a rundown of what the kit is like in pictures.


            See? It's just as easy as it sounds! The hardest part is remembering to check on it and change the water once a month. ;) I will let you guys know when/if ours starts sprouting! Hopefully it is closer to one month than four! I look forward to trying the AvoSeedo out with other vegetables too!

            Again, the holidays are right around the corner AND these make perfect “just because” gifts, especially for the green thumb in your family and circle of friends. Be sure to use the code below when you purchase your AvoSeedo kit!


This Is How We Roll Thursday Party

Monday, October 23, 2017

Fallowee Round Up #3: Festive Wreaths


            Hey folks! This should be the last of the Falloween Round Ups. I hope you all have enjoyed them and got some fun ideas for projects this fall. If you haven't done so already, be sure to check out the Falloween Craft Round Up and Falloween Round Up #2: Activities for Kids posts.
            Today we are focusing on wreaths! There are so many different ways and varieties of wreaths, I felt it deserved its own post as well. Happy crafting!

(Simply click on the pictures to be taken to the original post.)


This Is How We Roll Thursday Party

Thursday, October 19, 2017

Easy DIY Toddler Spider Costume


            Hey folks! As promised, here is round 2 of the easy Halloween costume posts. While we made this for our toddler, you could, of course, make it for older kids as well. Oh! And if you missed the first post, you can click on over to see how to make an easy and affordable tiger costume.

What You'll Need:

-Long blacked sleeved shirt
-Black Pants
-Black tube or crew socks (We used mens, but in hindsight, you might want to go with smaller ones for smaller children.)
-Black felt
-Filling for socks (Can be just about anything. We just happened to have some polyfil. You might also try newspaper or straw.)
-Hot glue gun
-Safety pins
-String (optional)
-Large needle (optional)

*First, get 6 of your tube socks and fill them to your desire.

*Next, cut two strips of black felt. You want them wide enough to glue your socks to and long enough to run the length of the shirt from roughly the armpits to the bottom. (I thought this was where John was going to pin it, but they ended up on the back. You will see what I mean later.)

*Glue your socks closed.

*Glue 3 socks on each piece of felt.

*We also put some extra glue on the backs of the socks just for extra durability.

*This part is optional, but you can attach each leg with a string or yarn and leave a loop at the end that your child can hold or secure near the bottom of their sleeve somewhere. This just makes all of their “spider legs” move whenever your child moves his or her real arms. :)

*Finally, secure your legs where you need/like with safety pins and you're done!


What We Paid: $13
-Socks: $5
-Shirt: $4
-Pants: $4
-Everything else we already had (Felt, safety pins, etc.)

Possible Cost: $22 (With Polyfil and safety pins added.)


            Do you believe me now that you don't have to be Susie Homemaker to make your own Halloween costumes? ;) What will your children be dressing up as for Halloween?

This Is How We Roll Thursday Party

Easy DIY Kids Tiger Costume


            Hey folks! Still looking for costume ideas for your kids? Or maybe you want to go the DIY route, but feel like you're not crafty enough or have enough time? If so, I have not one, but TWO posts you will want to check out today!
            If you've been hanging around for awhile, yes, you have probably noticed that we like to do a lot of crafty things around here. However, and please believe me, you do NOT have to be the ultra-crafty, Pinterest mom-type to be able to make your own kids costumes!
            Don't believe me? Check out this tutorial on how to easily (and cheaply!) make and put together a tiger costume! (This is with kids in mind, but you could totally make an adult version, if you're so inclined.)

What You'll Need:

-Black and white felt (Probably 1/4-1/2 yard of black; you'll want something bigger than those sheets you can buy in craft sections. White you'll want just enough for your chest piece.)
-Hot glue gun
-Fabric scissors (Otherwise you'll dull your normal ones in no time. Plus fabric ones just cut better for obvious reasons. ;) )
-Long-sleeve orange shirt (or t-shirt if you are in a warmer climate)
-Black or orange pants (we went with black because we already had some)
-Store bought tiger ears and tail costume kit

*Cut out a big white oval to go on the chest/belly.

*Cut out varying lengths of black stripes for the chest and belly. I looked up a picture of a real tiger for some inspiration. I found the less I thought about it as I was cutting, the better they turned out, if that makes sense.

*Cut varying lengths of black stripes to go on each arm. I “eyeballed” this and made ours to wrap around the long sleeves.

*Glue your white oval near the bottom of your shirt. (Tip: Make sure you work quickly, but smoothly with glue guns!)

 
*Arrange your stripes how you like, then go back and glue them to the sleeves.

*Arrange your stripes how you like them on the belly/chest of the shirt and glue them.


            See? Stupid easy! And, of course, it doesn't matter what order you cut your stripes out in or what order you glue them on in either. Now, let's do a little price break down, just for fun.

What We Paid: $10

-Shirt: $5
-Tiger tail & ears costume kit: $5
-Everything else we already had.

Possible Cost: $13

-This is with felt added in, which will probably be about $3 for ½ yard. If you also happen to need a glue gun, a cheap one will set you back around $2-5 and the sticks $3.


What do you think of this costume? I'd love to hear your thoughts below in the comments!

This Is How We Roll Thursday Party